Friday, October 28, 2022

How to create a slider card from a tag!! 9 of 10 weeks of fall


 Here we go after this only one more left and yes, my fall is moving into the Christmas holiday! Has to be only 9 weeks before the Holidays. 

Here are two cards that were made from the Santa Express designer series paper the celebrate with tags bundle and the Christmas Scottie stamp set. These are slider tags that were made fairly easily  

Materials -  A standard card base 2 tags of the tab kind - you will use only 1 1/2 . The slider is made from 1/2 of the one tag   The other half with the tabs created the second photo card. You will need two 4 by 51/4 pieces of dsp cut in the diagonal  one piece cut top left to bottom right and other cut top right to bottom left  of same side. Easier if one side has no direction  you will need a piece of white cardstock that is 2 by 3 1/8 - inside peekaboo section with Merry Christmas and snow flakes from the Christmas Scottie stamp set . Check out the video for more details  https://fb.watch/grWgnzy38c/


How to make a card with tags


I love making this style of card. Designer paper is cut to 12 by 5 1/4 - then score at 4,7 and 10. Fold accordion style so largest section ends up on a 4 1/4 by 5 1/2.  Then the first smallest flap fold front and is glued down to next section which is 3 inches wide.  Enjoy. 


If interested in this great bundle host code to use is HM7HE4WM


Thursday, October 20, 2022

#8 of 10 weeks of Fall.How to use treasured kindness for all seasons


 Here are some photos of how to change up the treasured kindness stamp set. I hope it helps you with more ideas. The last photo has a video of the card and it’s simple measurements. Video here https://youtu.be/w1NwtGcSeuw

This is the first card I developed. The tree screemed to me Halloween. I used the highly used and enjoyed tear back peekaboo style of card. I simply used the white craft ink pad. 


How to change up treasured kindness stamps

In the next few cards you will see how the set can be used as it is meant to be…………    

Here is another one that is a great box , I intend to introduce in my 10 weeks of fall. It will be 9 of 10.      
How to create a Christmas ornament box

Here is another one that is a fancy fold that I intend to introduce in my 10 weeks of fall. It will be last .       

Finally here we have a holiday card using pearlized enamel effects basics white. You will need to color when dry with chalk marker since it absorbs some of the green ink. 


In this picture I decided to use the blackberry beauty  designer paper found in the clearance rack. Check out how to make these cards that for in a standard envelope that are cut at 7 1/4 and 5 1/2 


Sunday, October 16, 2022

October Blog Hop- Sunshine SU Demo.


It’s all about Black and White....See below for materials, dimensions and more photos. Don’t forget to
check the blog hop participants in order to not miss anyone. You can visit my social media link and visit my shop or social sites : https://linktr.ee/renateewart thank you


Materials used were Splendid thoughts bundle ; basic white cardstock & black cardstock ; Vellum layering designs ; Deckled Rectangular dies 4 th from the smallest ; and finally our Brick and Mortar 3D embossing folder. See below for dimensions. Then below that you will find the blog hop participants. Don't forget to go to the other sites in order as not to miss anyone.


check out photo for die cut pieces used.       


Dimensions: Black Card stock 11 by 4 1/4 by 5 1/2 scored on long side at 51/2 
Basic White Cardstock 4 by 10 3/4 scored at 5 3/8  and 2 11/16 . Therefore the long side is folded in hals and then on side half again. the front Panel ends up to be a 3 by 4. Vellum is cut at a 4 by 5 1/4 

Blog Hop participants: 


Wednesday, October 12, 2022

How to make your label fit your card & featuring framed florets

                 https://youtu.be/mXZ5EmIyQMo

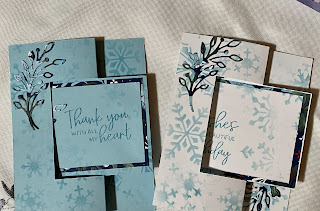
 This is #7 of 10 weeks of fall ! So here I have a flip card design using the framed florets. The first half of video is how to incorporate your label and sentiment  into your card without it looking like an add on to the card. Example photo below of what was discussed with many more examples on video. Even with the flip card I make sure the sentiment blends in with the card thru masking the snowflakes. 2nd half of video is the card instructions.  The Blue card on the left is completely symmetrical i.e. either side can be the front.  If that is what you are going for keep images to the right. The white card is not. I kept sentiment on left so only flowers are front of card. Both work but blue on is better. 

Cardstock needed : 5 1/2 x6 3/4 - Will be cut and scored          *Long side cuts : start and in at 1 1/4 and cut down to 41/4 - do this to both top and bottom .                                         *Short side cuts : start at 1/4 down and over to 2 3/4 - this cut occurs 4x - top- bottom -left -right                                  **Scoring long side from top to 1 1/4 @2 3/4 and 4 Repeat for bottom   

Framed florets   


Flip card

How to make your sentiment / label fit your card front
Here we have a few examples of how to work your sentiments into your card front. See video for much more examples. 


Wednesday, October 5, 2022

Using older kits to make fancy fold cards out of September 2022 paper pumpkin treat boxes


BOO 

Bendy  fold shaker card
    
                     https://youtu.be/tqq5Snwp2M0

So there are three actual kits that you can use to match up with the spooky treats paper pumpkin. The most recent one is the July 2022 P.P.- then the February 2022 and finally the March 2021 P.P.  I decided to make this sweet fancy fold card into a shaker cards using parts from the various paper pumpkins. I did  use some designer paper, but you could use cardstoxk instead. The front strip has to be  a 6 by 1 1/2 inches long and wide.  Using the 2 pieces created by simply cutting the wrap around lid I get the front and back of the shaker card. I need  half of a  fresh freesia card from one of the older paper pumpkins as the base card. I will also use about a third of the other half to make the shaker inset. A clear plastic bag is needed for the insert with shaker pieces. Once that is done all you need is to start stamping and have fun. 

Earth and Elegance suite fancy folds

 I really enjoyed making these cards I feel the style of this fancy fold is perfect for this designer paper and suite.   Here is the video l...